Product intro and specs
The Vandy Vape Kylin M AIO is a 70-watt Billet Box style device that Vandy Vape touts as being a truly rebuildable AIO. Similar devices have RBA heads that allow you to put your own build in, so what exactly is the difference?
It appears to be that the RBA head on the Kylin M has a mesh style deck. It’s a miniature version of the Profile and the Vandy Vape Mesh V2 RDA deck. It uses the same mesh strips as the Profile, but smaller strips than the Vandy Vape Mesh V2. You can also put in a single coil build or switch out the pod and use the one with the pre-built coil.
So, you have three different options, whereas on other rebuildable devices you only have up to two. Is that enough to place the Kylin at the top of AIO vapes out there? Keep reading to find out.
MyVpro sent me this kit for the purpose of this review.
Price: $67.99 (at MyVpro)
Colors: Wormhole, Fantasy Forest, Silver Moonlight, Polar Phantom
Build quality and design
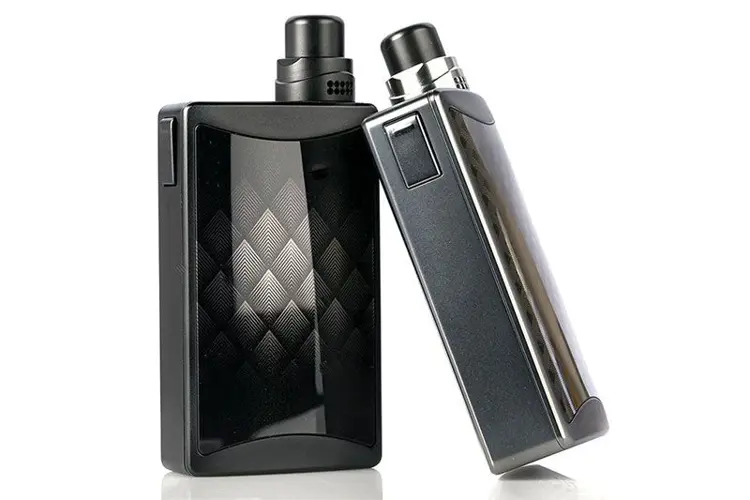
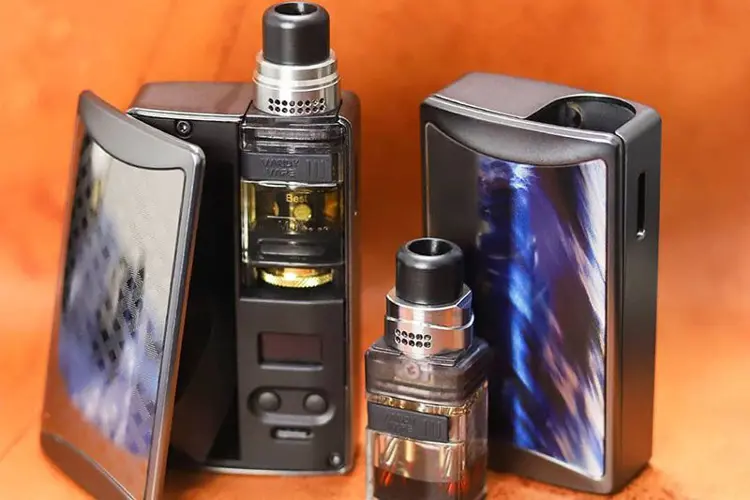
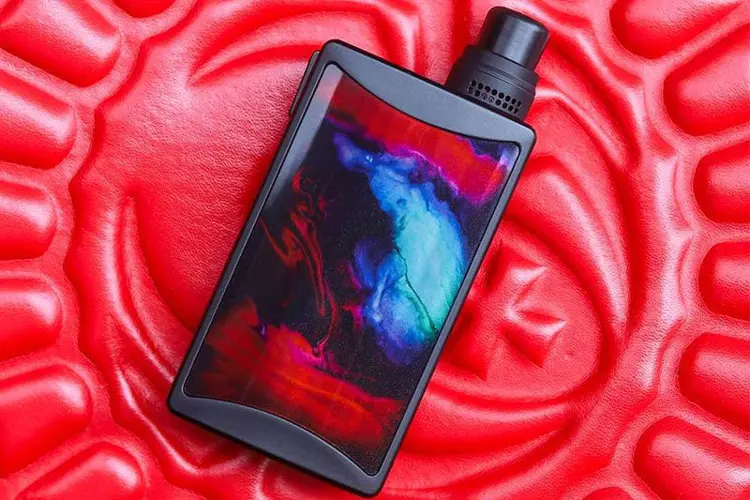
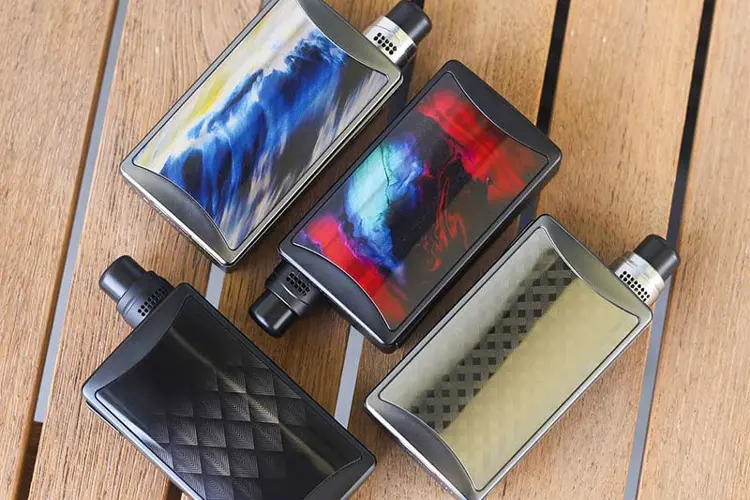
The Kylin M AIO feels solid and fits nicely in the hand. It’s kind of heavy for its size, which gives me the impression that it’s a well-built device. The finishes are interesting in that they have a sort of holographic effect. They sent me the one with the Wormhole finish, which has a geometrical pattern on it, just like the Silver Moonlight. But the Fantasy Forest and the Phantom Moonlight have beautiful colors with a nice swirl effect. I don’t know how they did it, but it looks like some kind of sticker placed on the panel. The other side of the device just says “Kylin” from bottom to top in large, block style letters that curve inward at the middle.
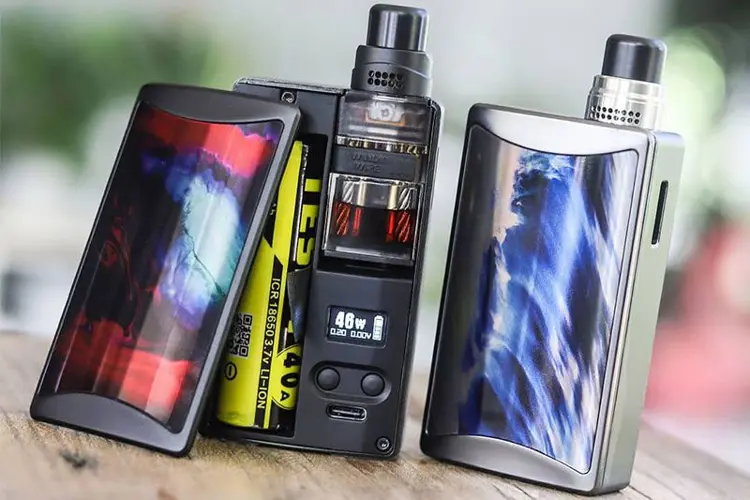
The device is powered by a single 18650, and the buttons and screen reside behind the battery panel. The screen is small but it’s easy enough to read, and the PCBA board is waterproof. The pod that uses the pre-built coil has a capacity of 2.5 mL, and the pod with the RBA head has a capacity of 5 mL.
The device tops out at 81.3 mm tall, and 100.8 mm to the top of the drip tip. It is 46.5 mm wide by 24.5 mm deep from the widest point in the center. It weighs a whopping 200 grams without the battery. There is a vertical window cut into the side opposite the fire button to monitor your juice levels. There are no magnets on the pods—they snap in and out at an angle and are seated tightly once in place. There are two large magnets on the door that hold it nicely in place. There is absolutely no movement or rattle. The door snaps in super tight, which is rather impressive. The drip tip is a nice, comfortable 510 acrylic tip—I originally thought it was Delrin, but it’s listed as acrylic and it feels to me like it is.
The display is in black and white. It shows you the wattage, resistance, voltage, and battery level. It will also show voltage in place of the wattage if you have it in VV mode, and it will show temperature if you have it in TC mode. The fire button is rectangular but will only make contact if you press it at the top. This appears to be intentional, since there is an indicator line at the top of the button that I assume is there to show you where to put your thumb.
Getting started
The adjustments for the device are as follows:
- Five clicks of the fire button turn the device on/off
- Three clicks to change modes
- Up or down to change wattage, voltage, or temperature
- Up and down at the same time for puff counter, stat, version, and TCR
- Fire button and up at the same time to lock the device
- Fire button and down at the same time to flip the screen
There is also a stat function where if you press the fire button it will show a horizontal progress bar that shows the time of your puff in seconds.
The functions are fairly easy to maneuver once you’ve done it a few times. As with any device, once you have your desired settings, you really won’t be messing with it too much. Just set it to your wattage, voltage, or temperature and that’s pretty much it. In fact, I don’t even see a need to lock the buttons—since you have to remove the panel to lock the buttons, it’s easier to just turn the device off. I think it would be hard to accidentally fire the device, since the button only makes contact if you press it at the very top, but better safe than sorry.
Replacing the pod is easy, you just push it out from the top or you can pull it out towards you. Once it’s at around a 45-degree angle, you can lift it out. To change the pre-built coil, pull it out from the bottom and then unscrew it from the base. Screw the new coil onto the base and push it back into the pod. To fill it, simply pull the silicon plug from the hole. You’ll know which side to pull because it’s marked with three little lines.
If you’re going to use the pod with the RBA head, you must use the enclosed tool in order to dry fire your coil to get the hot spots out. It’s a little plastic tool that you put on the top of the pod before you push it in. If you try this without putting the tool on, the pod will not make a connection and it will not fire. You can then use the tool to pull the pod back out of the device without having to push on the deck and mess up your build.
Performance
The Kylin M AIO comes with two pre-built coils, and they are both the 0.3-ohm mesh coil rated at 35-45 watts. It also comes with a Ni80 triple-core fused Clapton coil that is 0.23 ohms and four different mesh strips:
- A1 mesh (0.2 ohms, 40-60 watts)
- SS316L mesh (0.15 ohms, TC, 360-420F)
- Dual mesh (0.15 ohms, 50-70 watts)
- Ni80 mesh (0.15 ohms, 45-65 watts)
The 0.3-ohm mesh coil gives you a restricted DL draw and has pretty good flavor. It’s what you would expect from any prebuilt mesh coil in a device like this. The airflow is really smooth, and you can dial it all the way down to one row of holes and almost get an MTL draw. Unfortunately, the drip tip isn’t really designed for that because of its wide bore.
The coil works well with up to 80 VG liquids, but I don’t know if I’d use max VG. If you’re like me and normally use a dripper with regular nic, you’ll want to bump up the nic to the next strength. For example, I normally use 3 mg, but I had to bump it up to 6 mg to get a good throat hit. You could probably use 20 mg salt nic as well. Overall, the 0.3-ohm coil is really not too bad.
Kylin M AIO RBA
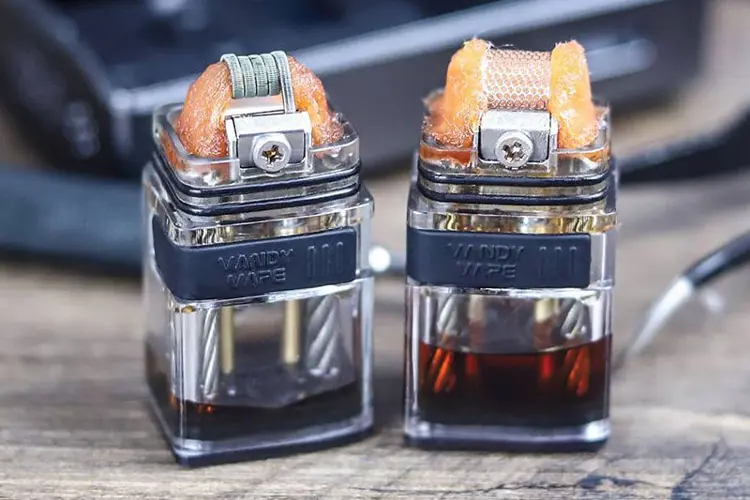
This is what builders like me will be interested in when using with this device. The miniature mesh deck allows you to use mesh strips or a single coil. There is the triple-core fused Clapton coil that’s included, or you can use your own.
When building on this deck, you’ll need to use the included tool so you can dry fire your coil to get the hot spots out. Push the tool down onto the top of the pod before inserting it into the device. As I mentioned earlier, without the tool the pod will not make a connection and will not fire. It also serves as a handle so you can pull the pod back out without messing up your build. You’ll also need to insert the four stainless steel rods into the deck that essentially turn the pod into an RDTA. Make sure you’ve done this before you wick your coil. They will allow for the juice to wick up to your cotton, and they work really well. Cut your cotton and tuck the ends in so they’re sitting right on top of those steel wires.
The mesh coils are good, but I just wasn’t getting a warm, dense vape. Not even as much as you’d get from a mesh RDA. Even the SS mesh coil in TC mode was giving me the same results. If you turn it up higher, then you just end up getting burnt hits. There’s no problem with wicking though, those steel wires really bring the juice up to the cotton.
Where this device shines, is with a single coil build. Instead of using the included coil, I made my own using Ni80 tri-core fused Clapton wire from Coilology. I used five wraps with a 3 mm diameter, and it came out to 0.33 ohms. The coil cutting guide says to cut the leads at 5 mm, and that works perfect. The deck has Phillips head screws that tighten down the clamps that hold your coils and the clamps are spring-loaded. I used the tool to get the hot spots out and wicked it with some Cotton Bacon Prime.
The vape I get is warm and flavorful and I only have to turn it up to 45 watts. I found that closing off just one row of holes on the airflow gives me the perfect draw. Of the three coil options, the pre-built, the mesh, or the single coil, this is the option that works best in my opinion. That is subjective though, some people may like the pre-built coils and some people may like the mesh, but for me…single coil is where it’s at.
There’s one last thing I’d like to mention about the temp control. Even though you can use it with SS, Nickel, and Titanium, it uses TCR instead of having individual options for each kind of wire. For some people that may not be a problem but for others it might.
Battery life and charging
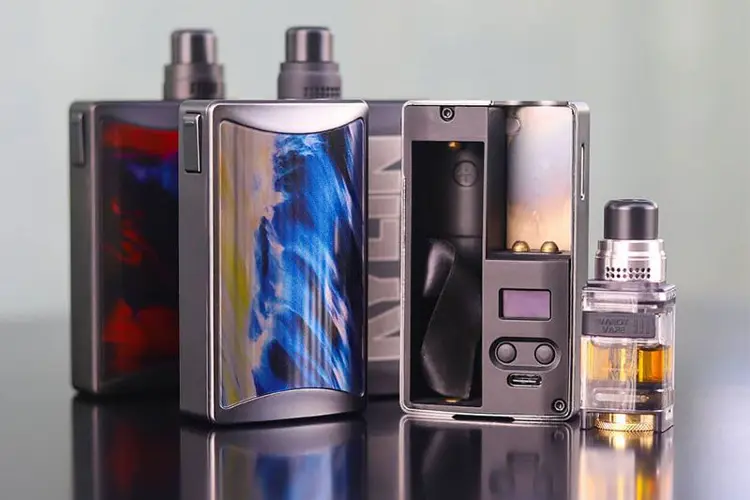
The Kylin M AIO uses an external 18650 battery that resides behind the panel and can be removed by pulling the battery strap. I would like to mention that even though the polarity is marked, it is extremely difficult to see. It’s marked by two slightly raised circles containing a (+) and (-) but they are in black, which is the same color as the device. They should have marked them with white or some other bright color. You can mark them yourself or just remember the positive end goes up.
I’ve been getting excellent battery life while running a single fused Clapton coil at 45 watts. I went three days before deciding it was time to change the battery. Of course, this will vary depending on battery type, coil type, and how often you vape. I feel like this was pretty good considering I rarely go days without having to charge batteries.
The USB charge port is type-C and has a maximum charge rate of 1.5 amps. This means you must use the included USB cable or another Type-C cable since the old micro USB style will not fit. When the device is on, the battery meter will flash, showing that it is charging. When the device is off, it will show both a battery meter and what percentage your battery is at. It also does passthrough charging, which means you can use the device while it charges. It is always recommended that you use an external charger, but should you decide to charge it with the charge port, 1.5 amps should be enough to have your battery charged in a couple of hours.
Pros / Cons
Gallery
Verdict
The Vandy Vape Kylin M AIO is great for DL vaping, but it may not be the best choice if you’re into MTL. You can cut it down and get pretty close, but the honeycomb airflow and the wide bore drip tip just wasn’t designed for that. You might be able to change your drip tip and get better results. With that being said, I couldn’t really find a lot of cons. It’s great for DL vaping and the airflow is nice and smooth. The flavor you get from the RBA pod with a single coil build is every bit as good as a dripper—in fact, you can use it as a dripper if you want.
Overall, it is a solid device if you want a compact kit that will easily fit in your pocket, or if you’re a builder who likes to play around with different builds. The quality is top notch, the finishes are nice, there are three different coil options to choose from—or you can use your own—and it comes with a ton of accessories. If this sounds good to you, then I say go for it. I don’t think you’ll be disappointed.
Recommended.


Because of declining cigarette sales, state governments in the U.S. and countries around the world are looking to vapor products as a new source of tax revenue.

A list of vaping product flavor bans and online sales bans in the United States, and sales and possession bans in other countries.

A closer look at PouchPoint, an online nicotine pouch store offering competitive pricing, wide selection, and a smooth shopping experience.

A practical, data-driven breakdown of where the vape market is heading—and how to position your business ahead of regulatory and category shifts.

Fiserv, BP, Marathon, and Valero warned retailers that unauthorized vape sales could cost fines or card-processing access.

BAT Germany’s Vuse will sell a Marina Hoermanseder case for Vuse Ultra starting in October after a Berlin Fashion Week debut.

New ASH survey data show most UK smokers wrongly believe vaping matches or exceeds smoking risk, undermining a key quitting tool.

FIFA bars smoking and vaping in 2026 World Cup stadiums, with mixed guidance on whether fans may carry vape devices.


![Image for New Product Releases [January 2026]](https://media.vaping360.com/images/January-2026-Monthly-Roundup-8c47e23b.webp?imageType=Standard&MaxWidth=400&MaxHeight=400)
![Image for New Product Releases [December 2025]](https://media.vaping360.com/images/round-up-december-b615cf31.webp?imageType=Standard&MaxWidth=400&MaxHeight=400)