Solo II Intro
A classic gets an update! The Solo II from Arizer is the 2017 upgrade of one of the most reliable dry herb vaporizers. By many of its users, the original Solo was/is a beloved workhorse of a session vape that produced incredible flavor and vapor.
I never tried the original, but it’s been on my radar for quite some time. From what I can tell, the best of it remains in the Solo II but now with several choice upgrades.
Tvape.com sent me the vaporizer for the purpose of this review. I will cover details about the device, how to use the device, the performance, and whether I recommend it. Some parts of this review will be like a guide, so use the subheads to help navigate. The details about the original Solo for comparison will come from research.
Solo II Gallery

Solo II Specs and Features
The Solo II is a dry herb portable vaporizer with digital temperature control up to 220°C/428°F. It features a full glass vapor path & bowl, fast heat up time, an internal battery that can last up to three hours, and it even has pass-thru charging. It’s very low maintenance and easy to use. The unit works by conduction though it can exhibit signs of convection. It has an efficient extraction of flowers that can produce numerous hits of the goods. With a fully customizable menu and a simple interface, the Solo II could be ideal for beginners all the way to seasoned veterans.
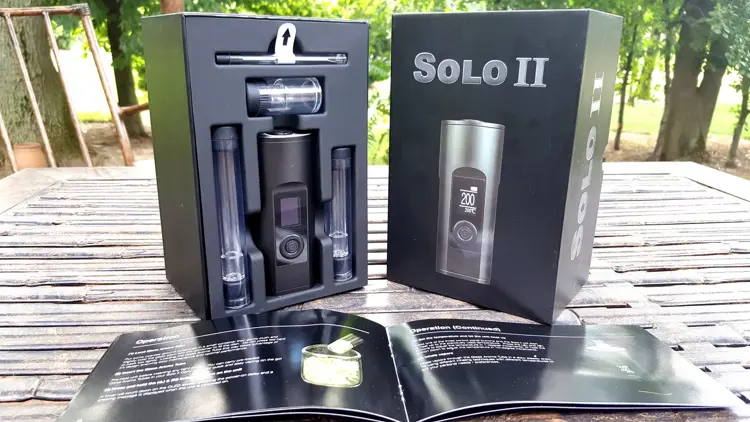
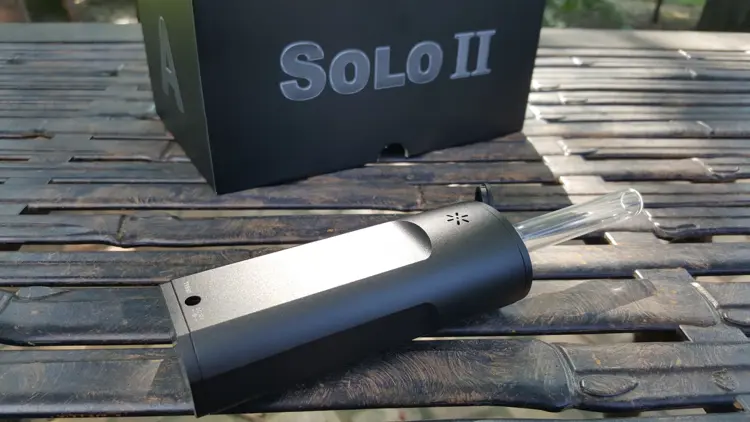
Apparently, Arizer products used to come in plain Jane packaging. But this box is sweet! It’s a big logo-branded, rigid box – big enough to perfectly fit a pair of my four-year old’s high-top Chuck Taylors. Even the instruction manual is nice. It’s huge compared to normal “fortune cookie” instructional manuals for vaporizers. It’s well laid out, and it’s easy to read on its glossy black paper.
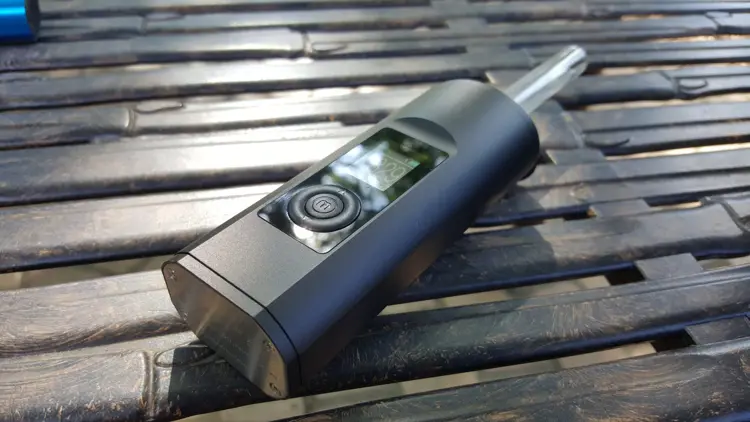
The Solo II
The Body
It’s less chunky in the midsection than the first Solo by 1 cm (10 mm), but the height and width are the same. It measures approximately 4.5” x 1.8” x 1.3” (114 mm x 45 mm x 33 mm). I love the way it feels in the hand. It weighs about 222 grams with the medium stem in (my preferred stem).
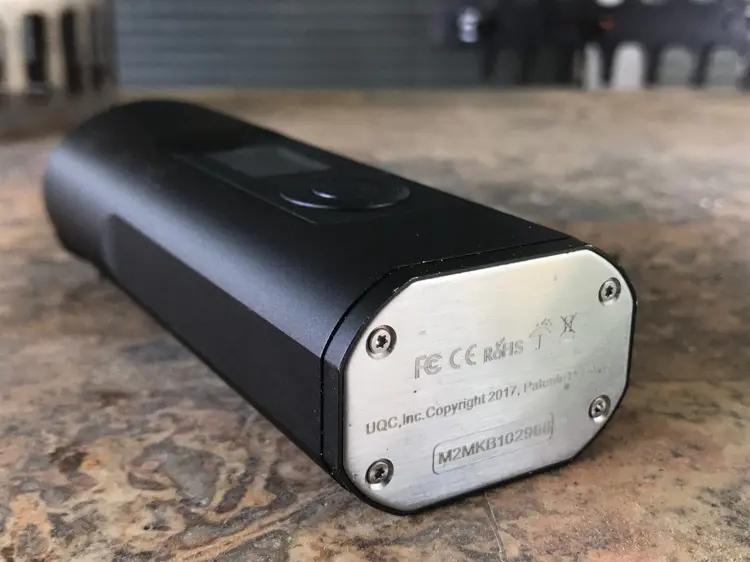
The Solo II is made from anodized aluminum with thick stainless-steel top and bottom plates (almost 3 mm thick). I’ve seen images and read some complaints about the first Solo regarding its bottom plate not being solid enough and cracking around the screws. That won’t happen here!
Key points
- Feels secure in the hand
- Quality finish of anodized aluminum
- Solid feel to the main body
- Durable
- Plastic button is the only plastic on the device
- Steel bottom and top plate
- Slimmer by 1 cm (10 mm) than the original Solo
- Same height and width as original solo
- Engraved serial number on bottom plate
Sanitizing the Solo II
Some have said the original Solo had a “hot metal” taste in the first sessions. The recommendation with the Solo II is to cycle through the heat-up/automatic cut-off three times. Ten minutes each at the highest temp – a so-called “burnoff.” I believe this began on forums and social media since it’s not in my instructions manual. I can report that there was no off taste after doing “burnoff.” Then again, I don’t know if there was an off taste without doing it.
Menu
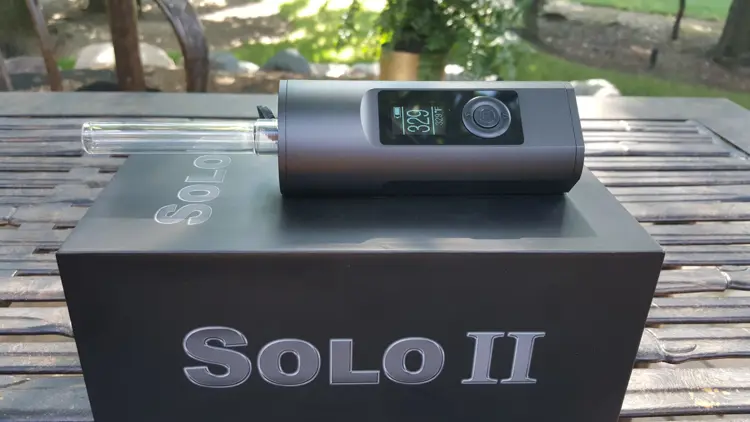
Such a simple menu. And it’s fully customizable! There are just three buttons. Arrow up, arrow down, and the center button, (M) menu. This is all new with the Solo II. The circular control pad, a large OLED, and digital temperature control.
After turning on the device, the temperature readout will drop if you don’t set the temp. Just click up or down to make the device register temperature adjustment. Do this each time you turn on the device or you will think it’s ready and it won’t be.
If you want to adjust the time of the automatic cutoff, you can. Even the start-up time can be adjusted… and this is without an app!
Menu Options
- Beep volume: high, medium, low, off
- Temperature setting: Celsius or Fahrenheit
- Startup time set: 8, 6, and 4 seconds
- Shut-off time: 5-15 minutes
- Screen brightness: high, medium, low
One small complaint is that there is a little bit of button rattle. Not a big deal, but it’s there. The screen is well lit at its brightest setting, and it’s easy to read even outside.
Heat-up time and heat soaking
30 – 60 seconds is about right. Other variables that affect the heat-up time is the temperature of the device when you turn it on (which is displayed), the temp you set it to, and how drained the battery is. When my battery is almost dead, the heat-up takes a little longer (up to an additional 15-20 seconds to get to max).
With a full battery and a room temperature of 24C/75F:
150C/303F in 20 seconds
189C/372F in 26 seconds
220C/428F in 35 seconds
If you want to get a vapor-producing hit on your first drag, I recommend heat soaking the stems and beginning at 187C/369F or above. Heat soaking is simply letting the stems stay in the device while it heats up. That allows the heat to transfer to the glass bowl before the herbs are inserted. This produces vapor much faster than using a cold stem. Let it stay in maybe 60-90 seconds after the device reaches temp.
Loading
You can load up a stem with coarsely ground herb or with a whole nug. No matter which method you choose, and which heat setting you’re on, moist herbs take longer to produce big vapor that dried-out herb. But if anything above 204C/400F with a heat soaked stem, you’ll make vapor instantly no matter the moisture content.
Packing the Solo II is super easy. Simply place 0.15 grams down to 0.8 grams of herbs in the stem’s bowl, lightly tap it in with your pinky making sure the bud stays up in the bowl. The important point is that the bud is meant to stay up in the glass bowl so it won’t be on the oven base where it can get scorched.
If your stem’s bowl is heat soaked and it’s hot, use some heat-safe tamp tool (like the back of stir tool included). You can easily place the herbs in without having to touch the glass. Although I heat soak the stems, the easiest way is to work with a room-temp stem.
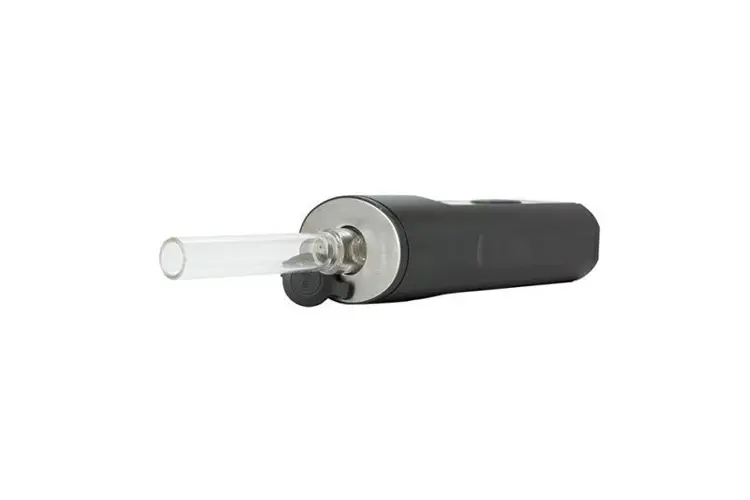
Glass stems
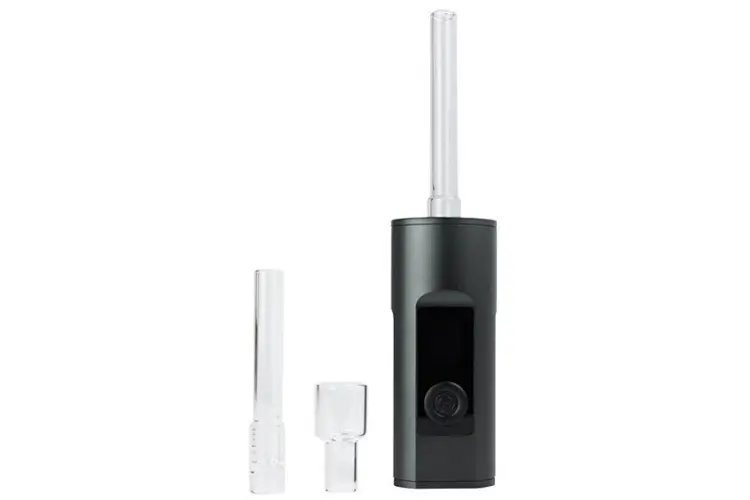
The two glass stems included are a medium (90 mm) and long stem (110 mm) and are compatible with the original and the Arizer Air. They’re easy to use and they are essentially the only thing that will need to be cleaned.
Inserting the stems is easiest when the unit already to temp due to the gasket loosening up after being heated. Once in, my stems fit into the unit quite snuggly unless I’ve had a 15-minute session, then stem wobbles some. I wish this wasn’t the case because I sometimes vape my Solo II upside down (something I do when I have with a light amount, like 0.8 g). I haven’t had a mishap, but it does wobble in long sessions.
Vaping with the Solo II: temperatures
Vaping on the Solo II is an absolute treat! Notable for me is the vapor quality, flavor, and the variety of session it offers. I can have a super short session, a super chill medium-length session or long session of incremental temperature jumps.
The amount of hits you can get off 0.7 grams - 1.0 grams is mind-boggling. And the Solo II will not quickly over-bake the herbs just by sitting there. You don’t have to rush, you can chill. But you can extract quickly too.
Starting at 148C/300F with ~20-degree jumps. This is great long for sessions. I can get a dozen or more hits of faint but tasty vapor at the first setting. Light effects, but they can be felt. Then I can jump 20 degrees and do it all again. Taking bigger hits, the flavor starts to come on a little bit more and so do the effects. Still producing dozens of hits. I usually cash out before reaching max temp. Counting hits becomes futile quickly! It keeps going and going…
Starting at 187C/369F is Great for coasting at one temp. This is a comfortable medium for intensity and vapor quality. This is where I prefer vaping high CBD strains since they are often a harsher vape anyway. The effects are moderate for shorter sessions and more intense with additional hits. Seasoned vapers can get a lot out of this temperature and smokers will feel it too. Great for flavor for the first 6 or so hits. And it takes a long while before the hits tastes spent (maybe two dozen or so).
220C/428F: OMG! Great for getting ripped quickly. Smokers that want to try vaping should begin here. I can pack 0.7-1.0 grams and get very intense – big hits – before the flavor and vapor begin to suffer. But, the flavor will get spent rather quickly. It's advisable to stir or rotate the bud so the bottom portion doesn't get scorched,
Hits… airflow… draw
The airflow on the Solo II is restricted, but not uncomfortably tight. Air comes in from the back of the device through the asterisk-like holes, but covering them up doesn’t really change the draw that much. I suspect air comes in through spacing around the stem. It’s difficult to tell.
Depending on how densely you packed your flowers, drawing on the stems give a nice amount airflow with a medium restriction – apparently slightly less restriction than the original Solo (due to some tweaking with the oven vents) now having heat jets – little dimples next to the vents.
In general, it’s best wait a little time in between hits. Vapor is better and the flavor is more intense if you give a little bit of time in between draws (like 10-20 seconds). Of course, you can hit it as much and as often as you want. Those are just tips to get "better" hits.
Battery
The Solo II battery is a beast! It really does last a long time, but it’s a non-removable battery. Well, it is removable with a tiny Torx driver, but you're also going to void your warranty in doing so.
I can't exactly say exactly how long it lasts as it will vary depending on how much heat and how many times it needs to change temp, but it sure does last a long time. I get a couple days out of a charge, and some of those are full 15-minute sessions.
But charging it takes up to 3 hours too. Luckily, you can vape it while you charge so it’s not really a big deal... and pretty much negates the charge time as a con. The charge port is on the back side near the bottom, which means you can charge it while it stands up. I believe this is change from the original Solo. Aside from my temp taking a tiny bit more time to heat when the battery is drained, I have zero complaints with the battery so far.
Portability
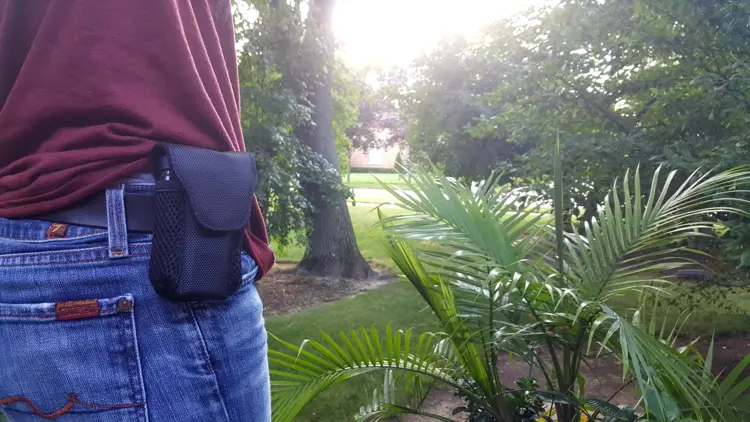
Some people refer to the Solo II (and especially the original) as an “at-home portable” because it’s larger and less discreet than most portables like the Pax or even the Arizer Air . But since Arizer added the little tactical-looking carrying case that holds the stem and device in separate pockets, it makes the device much more portable and fun to carry out. It sits securely on a belt loop, making carrying the Solo II hassle-free.
Also adding to the device’s portability, the stems come with rubber caps that allow bowls to be easily saved for later, or loaded for the future.
Cleaning and maintenance
Cleaning the Solo II is super easy. As long as you pack the herb up in the bowl, not letting it get on the base of the oven, it's supremely simple to maintain. The stems is all you really have to consider. I use a stir tool to pull out any caked-up bits, and drop the stems in a bag with isopropyl 99%. Sometimes I add salt. I let it sit for a few minutes, and then it's all good (maybe a couple wipes with a pipe cleaner).
Pros
Cons
Conclusion
I got excited when I found out I was going to be reviewing the Solo II by Arizer. Based on the reputation of the original, I was expecting good things. I never imagined it would be this good though. There is little to no real learning curve that you can't figure out in a session. All in all, I think this is a great vaporizer for anyone that wants to vape dry herb. With the ability to so easily remove the load from the heat source, you never have to worry about over-cooking during a cooldown, or having to rush to finish a pack!
I strongly recommend this vaporizer!
Shout out to Tvape.com for sending out this device for me to review.


Because of declining cigarette sales, state governments in the U.S. and countries around the world are looking to vapor products as a new source of tax revenue.

A list of vaping product flavor bans and online sales bans in the United States, and sales and possession bans in other countries.

A closer look at PouchPoint, an online nicotine pouch store offering competitive pricing, wide selection, and a smooth shopping experience.

A practical, data-driven breakdown of where the vape market is heading—and how to position your business ahead of regulatory and category shifts.

UK ministers opened a consultation on plain vape packaging, display restrictions, and flavor-name limits aimed at youth vaping.

Fiserv, BP, Marathon, and Valero warned retailers that unauthorized vape sales could cost fines or card-processing access.

BAT Germany’s Vuse will sell a Marina Hoermanseder case for Vuse Ultra starting in October after a Berlin Fashion Week debut.

New ASH survey data show most UK smokers wrongly believe vaping matches or exceeds smoking risk, undermining a key quitting tool.


![Image for New Product Releases [January 2026]](https://media.vaping360.com/images/January-2026-Monthly-Roundup-8c47e23b.webp?imageType=Standard&MaxWidth=400&MaxHeight=400)
![Image for New Product Releases [December 2025]](https://media.vaping360.com/images/round-up-december-b615cf31.webp?imageType=Standard&MaxWidth=400&MaxHeight=400)